A Guide To 3D Scanning Small Parts For Your Business
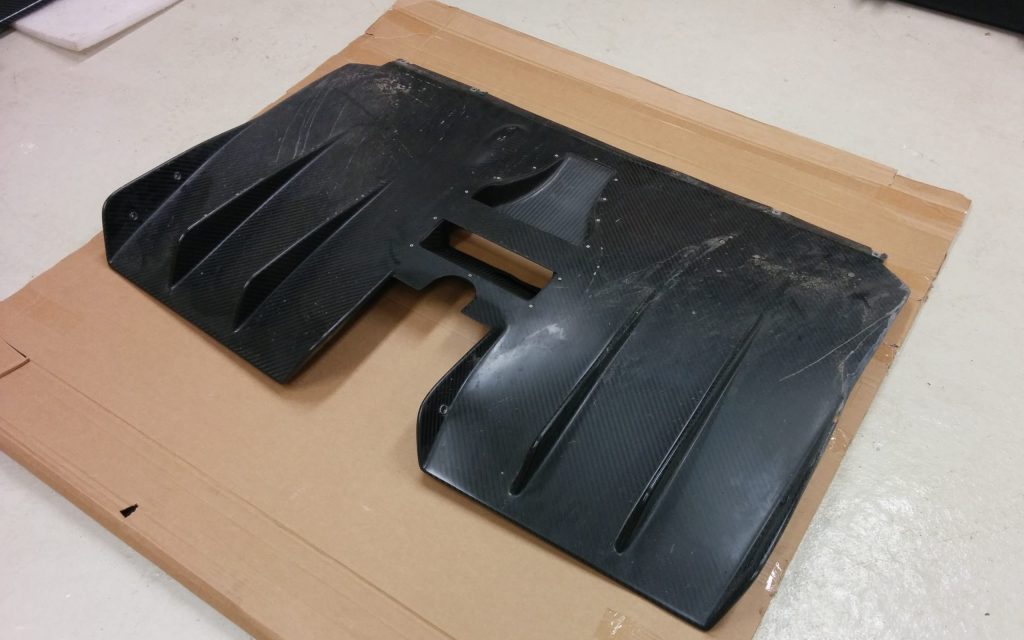
Real part
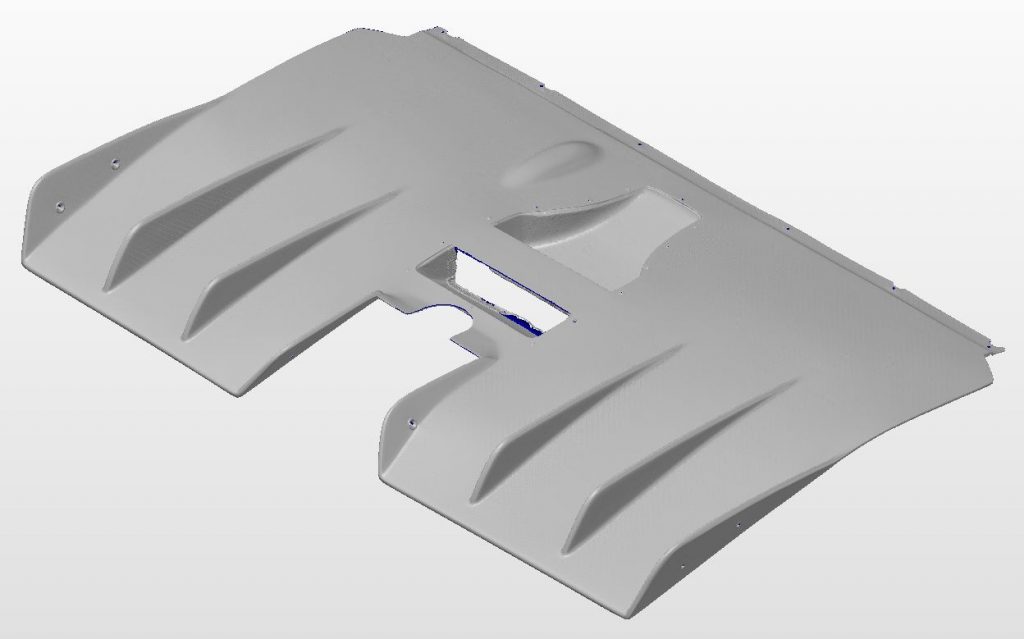
3D scanned part
3D scanning has boomed in the business world in recent years, and it is no surprise why. 3D scanning allows businesses to easily and quickly reverse-engineer different parts to form concept models, saving both time and money in the design phases.
To successfully 3D scan small parts, the 3 main steps are:
- Select the right 3D scanner
- Find a location with good lighting conditions
- Use a software to create the 3D model from the collected data
3D scanning small parts comes with its own set of challenges that businesses must consider when looking to use 3D scanning technology. Being well aware of how to do it will cut down on the time and effort necessary to do it correctly. Read on to learn everything you need to know.
How To 3D Scan Small Parts
3D scanning small parts can be difficult and frustrating to deal with, especially if you are working with fragile or not easily accessible parts. However, 3D scanning small parts is not that much different from 3D scanning any other type of part.
There are some things that you need to keep in mind when 3D scanning small parts, such as those discussed below.
Keep All Angles In The Open
When preparing to 3D scan small parts, it is essential to ensure that all angles of the object are in the open. If you have hidden angles, then the 3D scanner will not pick them up, meaning that you will not get an accurate 3D model.
With small parts, it can be a lot more challenging to get all the angles into the open, so there are several options that you can do.
- You can place the item in such a way that only a small portion can not be scanned. That way, all you have to do is some minor editing with 3D modeling technology.
- You can carry out a second scanning, having repositioned the small part in order to achieve that the hidden area is now visible and a different area of the object is now hidden. A software can then merge the data from both scans.
In the end, it will depend on what your personal setup is and the options open to you to overcome this.
Staying Still While Scanning
When you are 3D scanning small parts, you must refrain from making any sharp movement as you scan. Sharp movements cause the 3D scanner to get incorrect data points, meaning that your 3D scan will be inaccurate.
This is especially important if you are working with handheld scanners, meaning you will need to keep your arm steady and your movements fluid.
Alternatively, you can also get a 3D scanner where you position the small part in the middle of a rotating platform and the scanner itself is fixed. This system ensures a high stability.
You can also use a 3D scanner that is connected to an arm, allowing you to control the arm and complete your 3D scanning this way. However, these types of scanners tend to be more expensive, so that should be kept in mind.
Being At An Optimal Distance
When 3D scanning small parts, it is essential to ensure that you are at the optimal distance for your scanner. Each scanner has an optimal distance that you should have between the scanner and the part that you are scanning.
Typically, 3D scanners will come with their optimal distance in the user manual. If your 3D scanner does not include this in the user manual, you will have to take some time to learn yourself what the optimal distance is.
If you must find the optimal distance on your own, you will have to do a few test runs before you can begin scanning your actual parts needed. Take your time during this step, as it will save you a lot of time and money in the future.
Editing Your 3D Scans
After you complete your 3D scan, there will probably be parts of the scan that you will need to edit. Parts you need to edit might be:
- Areas where the scanner did not collect enough data
- Angles that were not fully mapped out
- Parts made out of reflective or transparent material
You will need to use Computer Design Aid software to edit your scan and turn it into a functional 3D model. The editing process will probably be one of your 3D scanning small parts project’s longest stages unless you have a high resolution and accurate 3D scanner.
Have Patience When Scanning
3D scanning small parts is a difficult task, and it can quickly turn frustrating. When 3D scanning small parts, it is essential to keep in mind to remain patient throughout the entire process. You will make mistakes when first starting, but that is part of the learning process.
Give yourself the time necessary to do a good job; that way, you will not rush when you are 3D scanning small parts. You can not go fast with that type of task, and it will only lead to mistakes, which will lead to more frustration.
Choosing The Right Location
3D scanning small parts rely on accuracy, and location plays a major factor in how accurate your scan will be. Whenever you are working with small parts, it is essential to try to do that work inside a place where you can control the lighting.
A very bright direct light, like the sun, makes it difficult for structured light and laser-based scanners to collect the data accurately, and those are the most common types used for small parts. If you cannot scan indoors, choose a location where you can cut back on the direct lighting. However, if you find yourself scanning outdoors:
- Try to scan in a shaded area
- Wait until evening comes along to cut back on the bright light of the sun
Direct sunlight can ruin a 3D scan, especially when it comes to 3D scanning small parts. Therefore, if you can dedicate a specific area to 3D scanning, you will be able to create an environment set up for your personal 3D scanning needs. A dedicated area should have consistent diffused lighting, and movement should be diminished.
By having that dedicated area for your 3D scanning, you can ensure that the 3D scans of your small parts will be as accurate as you can get them. It saves both time and money for you.
Decreasing Unneeded Data
When 3D scanning small parts, there are many times when you will wind up with a lot of unneeded data from the environment due to the field of view being so small. Unnecessary data can lead to a lot of extra work on your part, costing you both time and money.
Depending on how small the part is that you are scanning, you can decrease either most unneeded data or partially. Every 3D scanner comes with z-min and z-max values that you can change. These values are what you manipulate to cut back on unnecessary data.
After you have set the z-min and z-max values to their optimal settings for your part, the rest of the work will have to be completed in CAD software. In the CAD software, you will be able to cut out the unneeded data and only work with the data you need.
Using Computer-aided Design After 3d Scanning Small Parts
3D scanning could be done only with the 3D scanner, but that would defeat the purpose usually of 3D scanning small parts. If you want to do anything with your 3D scan, you will need computer-aided design software.
CAD software takes your 3D scan and then turns it into a 3D model that you can then edit, manipulate, view, or use however you want. After loading your 3D scan into your CAD software, you will most likely need to do some touch-up work depending on your scan’s quality.
Luckily, CAD software makes it easy to perform touch-ups on your 3D scans, and once you have your 3D model, you will be able to use it in the design process. This allows you to quickly and easily make edits to your design without implementing it in reality, saving time and money.
3D Scanner Types That Are Best For Small Parts
Since there are different types of 3D scanners, it is essential to know which types are best for working with small parts. This will sometimes depend on the scanner itself, but certain scanner types will work best with small parts as a general rule.
If the part is too small to use a scanner with a rotating platform, you will want to use a handheld scanner, as you will need to be up close to work with the small part. The short-range scanners are also typically better at scanning difficult materials, though they will still affect the accuracy.
In that case, you should take some time to practice before actually 3D scanning the small part you want. It can be easy to make errors, especially if you are using laser-based scanners. However, there are multiple types of scanners that can work.
- Structured Light scanners are typically the best type of scanning technology when working with small parts. These scanners can get incredibly accurate detail, and resolution is generally high as well. The accuracy differs by scanner, so you will need to check the specs of the 3D scanner you are purchasing.
- Laser-based 3D scanners also tend to work well for 3D scanning small parts, though they tend to be less accurate than structured light scanners.
Best 3d Scanners For 3D Scanning Small Parts
Now that you know the best types of 3D scanners for small parts are, you may be wondering what the best 3D scanners specifically are for 3D scanning small parts. Each scanner will have benefits and disadvantages depending on your specific needs, but these typically work well for most projects.
- The Metron E-HD 3D Scanner: The Metron E-HD 3D scanner is an excellent entry-level professional 3D scanner for small parts, meaning that it lacks some of the higher grade technology that comes with more expensive brands. It gets the job done, but it will not be as good as some of the more top-of-the-line brands.
- The HDI Advance R1X 3D Scanner: The HDI Advance R1X 3D scanner is one of the top-of-the-line brands when it comes to 3D scanning small parts. It comes with a flexible field of view, allowing the 3D scanner to tighten its field of view for small objects.
- The HDI Advance R5X 3D Scanner: The HDI Advance R5X 3D scanner has a higher resolution camera than the HDI Advance R1X. It has all the usefulness of the HDI Advance R1X with the flexible field of view, making this one of the best 3D scanners for small parts.
- The Metron Macro 3D Scanner: The Metron Macro 3D Scanner is specifically designed for 3D scanning small parts and has some of the highest resolution available for 3D scanning small parts.
There are also other good 3D scanners out there, so take these suggestions and figure out what type of scanner works for you.
The Importance Of Accuracy
When 3D scanning small parts, accuracy is of paramount importance, even more so than with other objects you may 3D scan. Since you are dealing with such a small part, the slightest mistake can completely skew your data, forcing you to start all over.
The smaller the object, the harder it will be to achieve perfect accuracy, and it can seem almost impossible to get accurate enough with small parts. Still, by following the below tips, you can increase the accuracy of your scanning:
- Be sure that you are using a small calibration board when 3D scanning small parts because the field of view will be so small. A 5 mm to 10 mm calibration board will be ideal for this type of work.
- Do not spray or paint the small part that you are scanning at all. Doing so can drastically change the accuracy of your scan and return skewed data. If you need to paint or spray the part, you should do the spraying or painting after the scanning has been completed.
- Eliminate any external factors that could affect your scan when you do it. The scanner should be placed on a sturdy floor along with the object you are scanning. If the foundation is shaky, this can cause inaccurate data.
- Spin the object on some type of turntable, manual, or motorized. Since 3D scanners have to get data from all angles, and small parts can be challenging to get every angle, this increases the scans’ accuracy.
No matter what you have to do, it is important to ensure the greatest amount of accuracy when working with small parts. After all, with small parts, a small mistake can be a big deal.
Check out our article “How Accurate Is 3D Scanning?” to learn more about 3D scan accuracy.
3D Scanning Small Parts With Difficult Materials
3D scanning small parts is already tricky enough, but some materials make 3D scanning small parts even more difficult. If you will be dealing with these types of materials, it is recommended that you spend a bit more time prepping before the scan.
3D scanners typically work well with all types of materials, but reflective and transparent materials are the exception to that rule. These surfaces make it difficult to get an accurate reading since the scanner’s lasers or light is reflected off, and no data is collected.
When you are already dealing with a small part, reflective and transparent materials only make the task more difficult. If you find that you have to scan this type of material, it would be best to use a developer aerosol spray to coat the object that you will be scanning temporarily.
This type of spray creates a light white finish to the object, making it easier for the 3D scanner to work with reflective and transparent materials. After you have finished your scan, you can easily brush off the spray, leaving the object how it was before the scan.
Taking Care Of 3d Scanners
When it comes to taking care of your 3D scanner, it is much the same as taking care of any technology. If a 3D scanner stops functioning properly at any time, it is advised to have an expert come in and fix it rather than fixing it yourself due to the machine’s complexity.
It is crucial to keep the lenses of the 3D scanner clean to ensure that the accuracy and resolution of your scans are not compromised. A good practice is to wipe the lenses before each use with a computer-screen safe cloth.
3D scanners should be kept out of humid areas and direct sunlight to ensure their longevity. Being left in direct sunlight can cause the 3D scanner to heat, frying circuits, or causing the calibrations to change, skewing your data.
Contact us
Whether you just have a small question or want to get a customized offer from us:
Contact us now.
We are happy to help you.